
 by Lettuce Be |
Last Updated: 11/20/2021
by Lettuce Be |
Last Updated: 11/20/2021 Contents
- 1 Growing Swiss Chard Microgreens: Getting Started
- 1.1 Right Amount of Swiss Chard Microgreen Seeds
- 1.2 Different Sizes Of Swiss Chard Seeds
- 1.3 Steps In Planting Swiss Chard Microgreen Seeds
- 1.4 Growing Without Light
- 1.5 Microgreen Trays
- 1.6 Germinating Under The Lights
- 1.7 The Biggest Issue With Swiss Chard Microgreens
- 1.8 Harvesting Swiss Chard Microgreens
- 1.9 The Taste of Swiss Chard Microgreens
- 1.10 Nutrition from Swiss Chard Microgreens
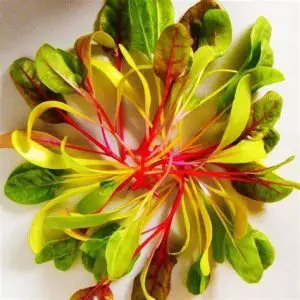
It is possible to grow many different colorful varieties of Swiss chard microgreens. This article explains how to grow Ruby Red, Golden Sunrise, and Fantasia Orange Swiss chard microgreens. As Swiss chard microgreens grow, they often maintain the hard, bark-like seed husk on the leaves like beets. The growing method we employ allows us to eliminate over 99% of these nasty seed hulls.
You need to overcome one of the most common mistakes to grow Swiss chard baby greens, but follow our steps, and you’ll soon be able to enjoy these tasty microgreens. We only succeeded with two of the three Swiss chard microgreens that were mentioned in the beginning – the Ruby Red and the Golden Sunrise varieties. Our problem with the Fantasia Orange chard was not the variety, the mixture of seeds, nor the planting method. Instead, careless watering, lack of care, and laziness were to blame. In the next section, we will discuss how to grow Swiss chard microgreens.
Growing Swiss Chard Microgreens: Getting Started
 Right Amount of Swiss Chard Microgreen Seeds
To calculate optimal seed density, one must take the finished size of the edible greens into account, but you should also remember that the density is derived mainly from the number of plants per square inch of planting surface.
As opposed to commercial microgreen growers, we believe home growers should pay closer attention to that rule. Since home gardeners are more concerned about growing nutritious microgreens. One of the challenges with Swiss chard cultivars is that, like beets, they produce more than one plant and show delayed growth stages. We made our first attempt more or less a guess based on previous experiences with Bull’s Blood Beet micro greens.
Different Sizes Of Swiss Chard Seeds
Seeds of Swiss chard differ in size significantly between varieties. Even at the same batch of seeds, there are variations. The orange variety has the largest seeds, followed by the red variety, and the yellow variety has the smallest.
Based on our experience, the smaller the seed, the fewer seeds it needs to produce a full tray of microgreens. Let’s see how that plays out as these seeds begin to germinate and grow into microgreens. The result is an optimal dosage of 6.2 grams of Ruby Red or Golden Sunrise Swiss Chard that can be used on your growing tray.
Steps In Planting Swiss Chard Microgreen Seeds
It did not matter whether we soaked the seeds in cold water or not. Using our preferred method, there were no issues with plant germination. Unlike how microgreen seeds are usually planted, the soil level of these trays is only at the first ledge of the tray.
Because we will cover these microgreens seeds with soil, we will not improve germination in the seeds. Instead, the plants will force themselves through the surface of the soil and the seed husk.We plant Swiss chard seeds by filling the tray a quarter full with soil and misting the soil surface with water. If the soil is too wet, it can lead to disease issues. So the surface should only be moist; the rest of the soil profile should be dry. The seeds need to be spread evenly, and more soil should be added to the seeds to cover them completely. Keep the soil moist, right down to the seeds; we want the soil to be damp.
Growing Without Light
A blackout is created by placing the microgreens into another tray. We then cover the top layer of the soil with a lid or another cropped tray, or with other material that makes contact with the soil. It is best to place two to five pounds of weight on top of the lid to enable it to be pushed onto the surface of the soil. Next, the tray, lid, and weight are covered with a tea towel or some similar material to exclude bright lights.
Swiss chard seeds are grown on these trays for five days to help them germinate and push their way through the soil. That time frame is a guideline; it can vary a day or so depending on the temperature, humidity levels, and how deeply the seeds are buried. Five days after germination, you should check on them again, as they are likely to sprout through the soil.
The young seedlings do not have enough time to be removed from the blackout. Make sure to spray the soil light brown and appear dry if it appears dry. Next, carefully place the covers back on, and leave the trays for two additional days. The microgreens spent a total of seven days in the blackout.
Microgreen Trays
Planting in heavy-duty 10×10 or 20×20 trays is important to us. We also plant peas in deeper trays with drainage holes. These will never break or break with normal use. Microgreens are grown for our uses by using regular microgreens trays and potting soil. We can grow microgreens in these trays and either stagger plantings or double the number of trays as needed.
As predicted by the seed size, Fantasia Orange microgreens have lower plant density than the other. Surprisingly, the Ruby Red variety has very good seeding density even though the seeds are considerably smaller than the Fantasia variety. This is probably the result of multiple plants sprouting from a single seed. If you have grown Rainbow Chard in the past, you are aware of the fact that the red variety is more vigorous than the orange, yellow, and green varieties.
Germinating Under The Lights
Once the Swiss chard microgreens have grown to their full size, place them in a watering tray and water them when needed. Interested in learning more about these terms and actions and growing microgreens? See our other articles.
Swiss chard can be grown in essentially any light or direct sunlight. Any natural light or artificial one will work. The Swiss chard microgreens that are shown here were grown under two inexpensive shop lights that we bought years ago.
Our Swiss chard microgreens grew in daylight-color LEDs for the past three years, but now we recommend using something underneath the trays for lifting toward the light, NOT chains. Chains are a PITA. Although there is no need for special lighting for growing microgreens, in general, the better the light, the better the microgreens.
The Biggest Issue With Swiss Chard Microgreens
Overwatering
Despite their vigorous growth, Swiss chard and beets are very vulnerable to damping-off disease. Those microgreens’ leaves and stems may look withered. An example is Fantasia Orange Swiss chard microgreens that have succumbed to damping-off disease owing to over-watering. This shows what happens when you are not careful when watering. The issue above occurred because we used a larger watering tray to water all three trays and added too much. Instead, the water should have been discarded after 15 or 20 minutes. Ten days into the germination stage, the Fantasia Orange Swiss chard microgreens were finished. There is no real need to worry, however, since the seeding density was too low, and the plants need to be re-tested.
Harvesting Swiss Chard Microgreens
In place of daily progressions, we will skip to the harvest stage. However, this is still premature as these microgreens are only just reaching harvest height. The Swiss chard microgreens we had are 14-days old. So from the seed to harvest in 14-days. We expect that they will continue to grow fine up to 30-days. Perhaps with the replanting of the Fantasia Orange Swiss chard, we can try that. We’ll have the information here or create a new article with links here when results are available on Fantasia Orange Swiss Chard Microgreens. Subscribe to get updates and find out when the microgreens are ready to harvest.
As long as you cover Swiss chard seeds with soil and remove the tough, nasty seed husks, Swiss chard microgreens are not the most difficult things to grow. You need to be patient and allow them a bit of time to emerge from the soil and grow large enough to be placed under the lights. Be careful not to drown them. Watering the planting tray in small amounts is better than flooding it with water. You’ll get lovely Swiss chard microgreens if you follow these three simple steps.
The Taste of Swiss Chard Microgreens
In addition to their captivating variety of colors, Swiss chard microgreens also have an interesting taste. This earthy flavor is mild, somewhat similar to beets and spinach, and a little sweeter. It adds another layer of flavor to salads, and we also drizzle balsamic vinegar on tomatoes and cheese so it will taste wonderful.
Nutrition from Swiss Chard Microgreens
The Swiss chard microgreens we eat have high levels of antioxidants, but we’re not nutritionists. Lutein, for example, has been shown to keep your eyes and skin healthy and prevent macular degeneration and also has anti-inflammatory properties. Additionally, microgreens derived from chard are reported to be able to reduce blood pressure and help with digestion. These microgreen varieties also include vitamins A, B, C, E, and K, calcium, magnesium, potassium, iron, and zinc.
Want to Give Swiss Chard Microgreens a Try?
If you are looking forward to growing Swiss chard microgreens, please tell us in the comments what variety you will be trying or what variety is your favorite!
